How to Manage Azure VMs with On-prem Windows Admin Center Leave a comment
Learn this information to discover ways to join an on-premises Home windows Admin Middle to an Azure vNET and handle VMs within the Azure vNET with WAC.
Overview and Introduction
Home windows Admin Middle has a function that means that you can create an Azure Digital Community. The method successfully creates a point-to-site VPN connection from the WAC server to an Azure digital community (vNET).
This hands-on information walks you thru the steps to finish all of the duties required to attach your on-prem WAC to an Azure vNET.
Though the primary process – Provisioning an Azure VM – begins with making a resouce group, you may skip these sub-tasks if you have already got an Azure useful resource group and a vNET.
Equally, making a VM is non-obligatory when you have current VMs within the Azure digital community. Earlier than skipping Process 1, you need to add a subnet referred to as GatewaySubnet – see Process 1.2 for particulars.
Process 1: Provisioning an Azure VM
On this part, you’ll provision a brand new Azure Digital Machine managed by an on-prem Home windows Admin Middle. Nonetheless, earlier than creating the VM, you’ll deploy an Azure Digital Community for the VM to make use of.
When creating the digital community, the deal with areas specified MUST not overlap with any of the deal with areas in your on-premises community.
In the meantime, to create the connectivitiy to Azure VM from the on-prem WAC, the digital community requires a subnet named GatewaySubnet. The gateway subnet have to be named GatewaySubnet for Azure to create the required gateway assets.
Additionally equally essential, the GatewaySubnet subnet have to be inside the deal with area of the Azure Digital Community.
So, we might add a GatewaySubnet subnet whereas creating the digital community. Lastly, we might create an Azure VM and connect the digital community.
Earlier than we create any of the assets talked about above, we require an Azure Resource Group to which all of them will belong.
Process 1.1: Create an Azure Useful resource Group
- Check in to portal.azure.com and open the Azure Cloud Shell PowerShell.

- Lastly, run the instructions under to create an Azure Useful resource Group referred to as IPM-WAC-RG within the “UK West” Azure area.
Change ‘ukwest’ to the Azure area location you wish to create the RG. To get a listing of all Azure areas, run the Get-azLocation command
#1. Get your Azure area - change uk to a reputation within the area you requireGet-azLocation | The place-Object {$_.DisplayName -like "*uk*"}
#2. Set location and RG identify variables
$RGlocation = 'uksouth'
$RGName="IPM-WAC-RG-1"#3. Create the Useful resource Group
New-AzResourceGroup -Location $RGlocation -Identify $RGName
To verify that the RG was created, run this command:
Get-AzResourceGroup -Identify $RGName

Process 1.2: Create a Digital Community with a Digital Community Gateway Subnet
In my house lab community, I’ve the 192.168.0.0/24 and 172.16.0.0/24 networks. So, my Azure Digital community deal with areas have to be exterior these two.
One possibility is to create a vNET with the 172.17.0.0/22 (172.17.0.0/255.255.252.0) community. This can give me 1,024 addresses.
Whereas creating the digital community, I’ll add a default subnet referred to as subnet0 with a beginning deal with of 172.17.0.0, on /24 (256 addresses), a spread of 172.17.0.0 – 172.17.0.255.
Equally, I’ll add a Digital Community Gateway subnet. When you choose a Digital Community Gateway for the aim of the subnet, Azure calls the identify of the subnet GatewaySubnet. You would additionally do that with PowerShell.
The GatewaySubnet subnet may have a beginning deal with of 172.17.1.0, a dimension of /27 (32 IP addresses), and a spread of 172.17.1.0 – 172.17.1.31.
To create the Azure Digital Community and the opposite assets described above, run these PowerShell scripts within the numbered order, beginning with #1.
In instructions #3 and #4, discover that I piped the output of the Add-AzVirtualNetworkSubnetConfig command to the Set-AzVirtualNetwork command. Right here is why: If you run the Add-AzVirtualNetworkSubnetConfig command, it creates a subnet configuration object. Nonetheless, it doesn’t apply the configuration to the digital community. By piping Add-AzVirtualNetworkSubnetConfig to Set-AzVirtualNetwork, the subnet configuration is utilized to the digital community useful resource.
#1. Set Variables
$AzVirtualNetworkName="IPM-WAC-vNET-2"
$AzResourceGroup = 'IPM-WAC-RG-1'
$AzRegion = 'uksouth'#2. Create the digital community
New-AzVirtualNetwork -Identify $AzVirtualNetworkName -ResourceGroupName $AzResourceGroup -Location $AzRegion -AddressPrefix '172.17.0.0/22'#3. Create subnet0
Add-AzVirtualNetworkSubnetConfig -Identify 'subnet0' -AddressPrefix '172.17.0.0/24' -VirtualNetwork (Get-AzVirtualNetwork -Identify $AzVirtualNetworkName -ResourceGroupName $AzResourceGroup) | Set-AzVirtualNetwork#4. Create GatewaySubnet
Add-AzVirtualNetworkSubnetConfig -Identify 'GatewaySubnet' -AddressPrefix '172.17.1.0/27' -VirtualNetwork (Get-AzVirtualNetwork -Identify $AzVirtualNetworkName -ResourceGroupName $AzResourceGroup) | Set-AzVirtualNetwork
Process 1.4: Overview the vNET and its Subnets
Earlier than transferring on, let’s affirm that the digital community and the 2 subnets have been created accurately.
- Reduce or shut Azure Cloud Shell. Then, seek for the identify of the Azure Digital Community—in my instance, IPM-WAC-vNET-2—and open it.

- Then, develop the digital community’s Settings and click on Handle area. The deal with area ought to be configured as proven on the second display screen under.

- After that, click on the Subnets menu and ensure that the 2 subnets – subnet0 and GatewaySubnet – exist.

- Lastly, open the subnet0 and GatewaySubnet subnets and overview their settings.
The Subnet, subnet0, ought to be a default subnet, whereas GatewaySubnet ought to be a Digital Community Gateway subnet.


Process 1.5: Create an Azure Digital Machine
Lastly, create an Azure VM with this script under:
Execute the scripts in Azure Cloud Shell.
#1. Set variables$AzResourceGroupName="IPM-WAC-RG-1"
$AzRegion = 'uksouth'
$AzVirtualNetworkName="IPM-WAC-vNET-2"
$subnetName="subnet0"
$vmName="WAC-AZ-VM-1"
$nicName="WAC-vNETAdapter-4"
#The picture under is the SKU for "Home windows Server 2022 Datacenter: Azure Version - Gen2" - #the one Home windows Server 2022 picture on the Azure free tier
$VMImage="MicrosoftWindowsServer:WindowsServer:2022-datacenter-azure-edition-core:newest"
$vmSize="Standard_D2s_v3"
$PublicIPAddressName="WAC-Public-IP-4"
$adminUsername="WACAdmin"#2. Create a public IP deal with for the VM
New-AzPublicIpAddress -ResourceGroupName $AzResourceGroupName -Identify $PublicIPAddressName -Sku Commonplace -Location $AzRegion -AllocationMethod Static
#3. Save the Public IP ID and Subnet Id in a variable
$PublicIpAddressId = (Get-AzPublicIpAddress -ResourceGroupName $AzResourceGroupName -Identify $PublicIPAddressName).Id
#Get the vNET and Useful resource Group
$AzVirtualNetwork = Get-AzVirtualNetwork -Identify $AzVirtualNetworkName
$AzResourceGroup = Get-AzResourceGroup -Identify $AzResourceGroupName$SubnetId = (Get-AzVirtualNetworkSubnetConfig -Identify $subnetName -VirtualNetwork $AzVirtualNetwork).Id
#4. Create a community interface card for to be hooked up to the VM
New-AzNetworkInterface -Identify $nicName -ResourceGroupName $AzResourceGroupName -Location $AzRegion -SubnetId $SubnetId -PublicIpAddressId $PublicIpAddressId
#5. Set admin credentials - when prompted, enter the admin password for the VM
$AdminCredential = (Get-Credential -UserName $adminUsername -Message "Enter the password for the VM")
#6. Create the Azure digital machine - that is th
New-AzVm -ResourceGroupName $AzResourceGroupName -Identify $vmName -Location $AzRegion -VirtualNetworkName $AzVirtualNetworkName -SubnetName $subnetName -PublicIpAddressName $PublicIPAddressName -Picture $VMImage -Measurement $vmSize -Credential $AdminCredential -OpenPorts 3389
When operating command #6, creating the VM will take some time.

Process 2: Deploy Hybrid Connectivity with Azure Community
Now that you’ve got created an Azure VM, the digital community, and the GatewaySubnet subnet, it’s time to register the Home windows Admin Middle in Azure and create an Azure Community Adapter in Home windows Admin Middle.
This process goals to verify which you could set up hybrid connectivity between an on-premises server and the Azure VM you provisioned in process 1.
Process 2.1: Register Home windows Admin Middle with Azure
- Check in to the Home windows Admin Middle on a browser.
- From the Home windows Admin Middle web page, click on the Home windows Admin Middle (WAC) Server to open it.
The WAC server ought to seem because the gateway server.

- When the server particulars web page opens, click on Community and choose Add Azure Community Adapter (Preview).

- Choose the Register Home windows Admin Middle to Azure possibility on the Add Azure Community Adapter pop-up.
The notes on the pop-up state that creating an Azure Community Adapter permits you to configure a Level-to-Website VPN connection to Azure. A Level-to-Website (P2S) VPN gateway means that you can join particular person computer systems—on this instance, the on-prem Home windows Admin Middle pc – to an Azure Digital Community.

- After that, click on the Register button on the Register with Azure web page.

- Then, on the fly-out window, choose Azure Cloud and replica the code in step 2. After copying the code, the step 3 hyperlink might be activated. Click on the Enter the code hyperlink—a hyperlink will open in a browser tab.


- Enter the code you copied in step 5 and click on Subsequent. After that, sign up to your Azure account and ensure the entry.


- When the brand new browser shows a affirmation web page, return to the Home windows Admin Middle. Then, choose the Microsoft Entra (tenant) ID to connect with.
After that, on the Microsoft Entra utility, click on Create new, click on Join, and look forward to the app to be created.

- Click on the Check in button to attach the WAC server to your Azure account. Lastly, examine the “Consent on behalf of your group” checkbox on the “Permissions requested” pop-up window and click on the Settle for button.


The registration particulars might be displayed within the Home windows Admin Middle. To view the registration in Azure, click on the View in Azure hyperlink.

Process 2.2: Create an Azure Digital Community Gateway
An Azure Digital Community Gateway connects your WAC server to the Azure vNET. Within the following steps, you’ll create one after which the point-to-site VPN from WAC.
- Check in to your Azure portal, seek for the digital community gateway, and open the useful resource.

- Then, on the Digital Community Gateway web page, click on Create digital community gateway

- Lastly, arrange the brand new vNET gateway utilizing my screenshots under.
- Within the first screenshot, as soon as you choose the subscription you will have been utilizing on this deployment, Azure populates the useful resource group primarily based on the digital community useful resource group
- Then, on the Occasion particulars part, give the digital internet gateway a reputation and choose the Area if the best one will not be chosen robotically
- Choose an possibility from the SKU drop-down menu. The VPN gateway SKU you select determines the bandwidth you get and the value you pay.

- After getting into the small print, click on Overview + create on the backside left. Lastly, click on Create to deploy the gateway.


Await the deployment to finish earlier than continuing to process 2.4 under. The deployment can take between 20 and 45 minutes to finish.

Process 2.4: Create an Azure Community Adapter in WAC
After creating the digital community gateway in Azure, you could add a point-to-site (P2S) configuration. You would do that from Azure or by way of WAC.
Nonetheless, configuring the P2S by way of WAC is less complicated because it permits autogenerating a self-signed certificates. Observe the steps under so as to add a P2S configuration to the Azure vNET gateway.
- Open the WAC server from the All Connections web page in Home windows Admin Middle, click on Networks, after which click on Add Azure Community Adapter (Preview).
- Then, on the Add Azure Community Adapter fly-out, choose your Azure Subscription, the Azure area (Location) the place you created the assets in Process 1, and the Azure Digital Community—the Gateway Subnet might be chosen robotically and grayed out.
It can then robotically detect the vNET gateway hooked up to the vNET. The Gateway SKU chosen while you created the vNET might be proven and grayed out.
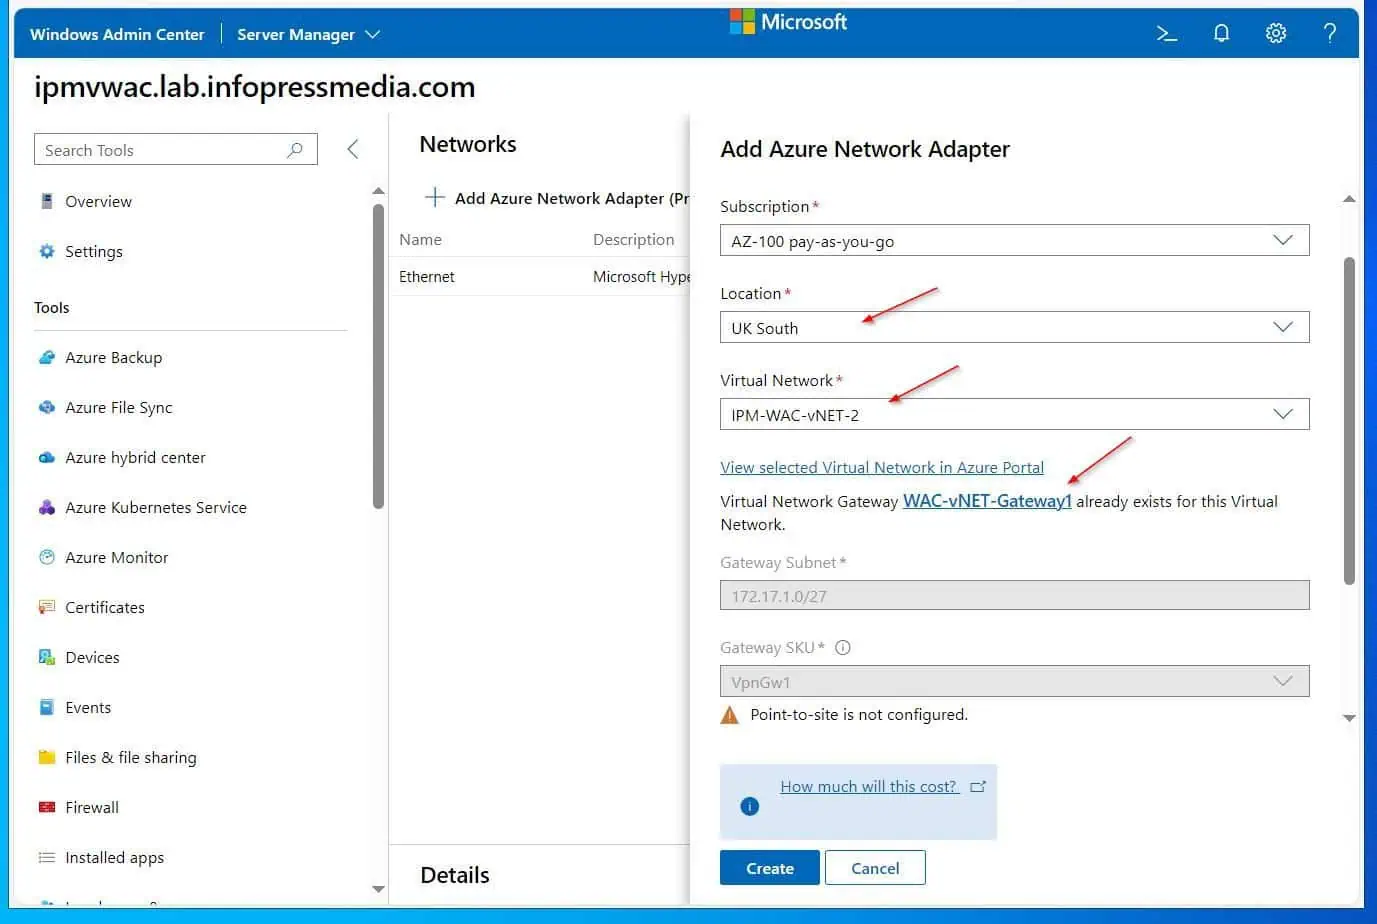
- On the Shopper Handle House, assign an IP deal with vary to dynamically assign shoppers connecting over a Level-to-Website VPN.
Lastly, within the Authentication Certificates possibility, choose “Auto-generated Self-signed root and shopper Certificates,” then click on Create.
Use a non-public IP deal with vary that doesn’t overlap with the on-premises location from which you join or the Azure Digital Community to which you wish to join. I’m utilizing 192.168.1.0/24.

If you click on Create, WAC sends the request to Azure. It can take some time for the S2P to be created in Azure.
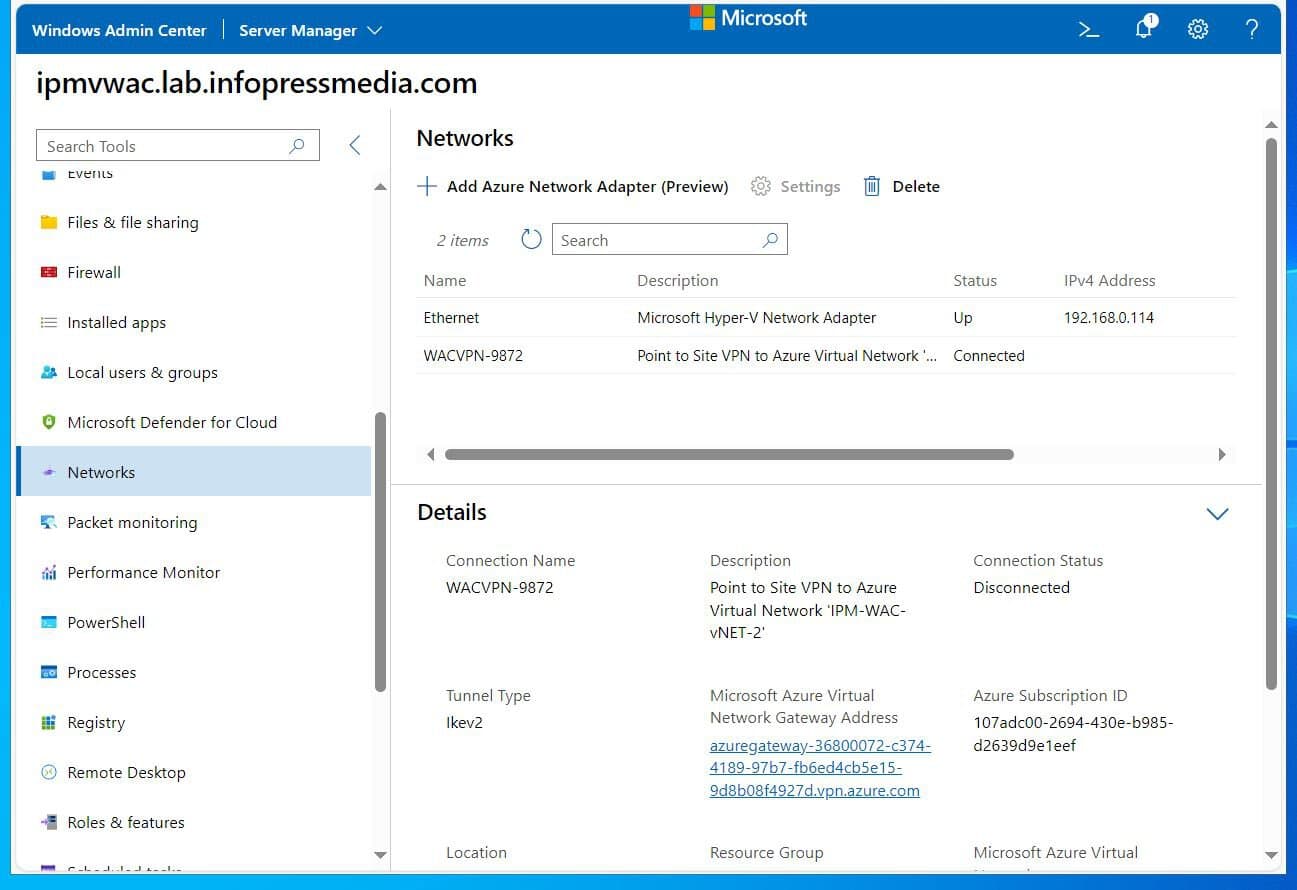
After some time, refresh the web page to show the Azure Community adapter (the point-to-site connection from the WAC server to the Azure digital community).

As soon as the Azure Community adapter is displayed in WAC, the configuration may also be displayed for those who open the digital community gateway in Azure and open its Level-to-site configuration menu.

If you happen to scroll down, you will notice the IP deal with allotted to the point-to-site connection from WAC. You may ping this IP out of your WAC server.


You can too RDP to the Azure VM from the WAC server by way of its Non-public IP deal with. To get the VM’s non-public IP deal with, open it in Azure – see the second screenshot under.
At this level, your on-prem WAC server can be utilized as a soar server. With a point-to-site connection to the WAC server, you may RDP and handle all Azure VMs within the Azure Digital Community.


Process 2.5: Harden the Community Safety Group
If you created the VM, the command included permitting entry to the VM by way of port 3389 (RDP). By together with this, a Community Safety Group and an Inbound Safety Rule have been created to permit the RDP port.
Nonetheless, this inbound rule is configured to permit any IP, which isn’t nice. To harden the safety of the Azure Digital Community, we have to modify this inbound rule to permit particular IP addresses.
Listed here are the steps:
- After that, search Community Safety Group and open it from the outcomes. Then, open the NSG—it ought to have the identical identify because the Digital Machine.


- As soon as the NSG opens, click on the RDP (port 3389) inbound rule.

- On the fly-out window, change the Supply from Any to IP Addresses. Then, enter the Shopper Handle Pool community you used while you arrange the Azure Community Adapter in WAC—see the second screenshot under.


- Lastly, to verify that the WAC S2P remains to be linked, open the WAC server’s Community menu in Home windows Admin Middle and refresh the settings.

By configuring the RDP inbound rule to permit the WAC vNET gateway S2P community solely, you disable RDP entry to the VM from different IPs, together with accessing the VMs RDP by way of their public IP addresses.
Process 3: Handle the Azure VM with the on-prem WAC
On this process, you’ll add Azure VMs to your on-premises Home windows Admin Middle server.
Process 3.1: Create an Inbound Safety Rule for the WAC Server on Azure NSG
To permit WAC connection to Azure VMs, create an inbound port rule permitting connectivity on TCP port 5986 utilizing the steps under.
- Seek for and open community safety teams.

- Then, click on the NSG to open it.

- After that, develop its Settings, then select Inbound safety guidelines.

- Then, click on “+ Add” within the high center window and configure the inbound safety rule by following my screenshots under.


Process 3.3: Configure winrm and Firewall on the Azure VM
Other than configuring the Azure NSG firewall to permit WAC connection, you need to additionally arrange the Home windows firewall. In the meantime, you additionally have to configure WinRM within the Azure VM.
To finish these two duties, RDP to the Azure VM and run the next instructions:
#1. Configure WinRMwinrm quickconfig -quiet
#2. create a firewall rule that enables WINRM-HTTP site visitors
Set-NetFirewallRule -Identify WINRM-HTTP-In-TCP-PUBLIC -RemoteAddress any
Process 3.4: Add the Azure VM to the Home windows Admin Middle
- From the WAC server’s All connections window, click on Add.

- Scroll to the Azure VMs part and click on Add.

- Then, sign up to the Azure account.


- Now, click on on the IP deal with of the Azure VM you simply added to WAC, present its native admin credentials, and sign up.


- After connecting to the VM, while you return to the Server checklist, its identify might be added to its IP deal with:

Process 3.5: Create a New Azure VM from WAC
You can too create new Azure VMs from the Home windows Admin Middle. The screenshots under illustrate the primary few steps.
After I wrote this information in September 2024, creating an Azure VM from WAC was in preview, so some Azure VM SKUs weren’t obtainable.


Process 4: Deprovision the Azure Surroundings
One of many advantages of making all assets in an Azure Useful resource Group is ease of deployment, replace, and deletion. So, to delete all of the assets created on this lab, all you need to do is delete the useful resource group.
If you delete a useful resource group, it deletes dependent assets to keep away from errors. If you happen to attempt deleting the assets manually, deleting a useful resource one other useful resource makes use of throws an error message.
You may carry out this process by way of the Azure Portal or Azure Cloud Shell PowerShell.
To delete the useful resource group and all its assets by way of the Azure Portal, open the useful resource group and click on Delete useful resource group.

Alternatively, open Azure Cloud PowerShell and run these instructions:
#1. affirm that the Get-AzResourceGroup command returns the useful resource group you plan to deleteGet-AzResourceGroup -Identify 'IPM*'
#2. Delete the useful resource group and run the command as a job
Get-AzResourceGroup -Identify 'IPM*' | Take away-AzResourceGroup -Pressure -AsJob
#3. Monitor the progress of the job by operating this command every now and then.
#when the standing shows "Working" the delete process remains to be ongoing.Get-Job -Identify *lengthy*
Whereas the job remains to be operating, opening the useful resource group within the Azure portal will show “Deleting.”

Conclusion
The Home windows Admin Middle presents SysAdmins, a terrific instrument for managing on-premises /Azure Hybrid infrastructure. On this information, I defined easy methods to put together your Azure atmosphere for a point-to-site reference to an on-prem WAC server.
I additionally demonstrated the steps to attach the on-prem WAC server and add Azure VMs for administration.
I hope you discovered the information useful. Let me know your ideas by responding to our “Was this web page useful?” suggestions request under.