How to Check Your PC Specs in Windows Leave a comment
A fast information that will help you discover out what specs your PC has.
If you’re planning on upgrading your laptop, fixing an issue together with your system, or simply wish to know what you’re working with, it’s possible you’ll have to examine your PC’s specs. Fortuitously, you don’t must open up your system or obtain something sophisticated to search out out what elements you have got.
Home windows offers you a number of alternative ways to shortly examine your system’s major elements like its processor, graphics card, reminiscence, and storage. On this information, we’ll present you the best methods to search out your specs, together with a number of instruments you should use if you would like much more detailed info.
Whether or not you’re making an attempt to determine if an improve is sensible otherwise you simply wish to know precisely what’s inside your machine, we’ve bought you coated.
The best option to examine your laptop’s {hardware} is by utilizing one in all these built-in Home windows instruments:
- System Info: Sort ‘system’ into the Home windows search bar and hit Enter. This exhibits your CPU, RAM, Home windows model, GPU (below Parts > Show), and motherboard data (on newer techniques).
- About Your PC: Sort ‘about’ into the Home windows search bar and hit Enter. This shows your CPU, reminiscence, and Home windows model.
- Job Supervisor: Sort ‘activity’ into the Home windows search bar and hit Enter. Then swap to the Efficiency tab to view your CPU, reminiscence (together with velocity), and GPU info.
Step-By-Step Video Tutorial

Fast Comparability: The place to Discover Your PC Specs in Home windows
| Instrument | CPU | GPU | RAM | Storage | Motherboard |
|---|---|---|---|---|---|
| System Info | ✅ | ✅ | ✅ | ❌ | ✅ |
| About Your PC | ✅ | ❌ | ✅ | ❌ | ❌ |
| Job Supervisor (Efficiency Tab) | ✅ | ✅ | ✅ | ❌ | ❌ |
| Gadget Supervisor | ❌ | ✅ | ❌ | ✅ | ❌ |
Moreover, you’ll be able to examine every particular person element in your system utilizing the steps supplied under.
Verify Your CPU
When you’re questioning what sort of processor you have got, you’ll be able to simply discover out that info on a Home windows 11 (or older) laptop in two clicks.
Verify Your CPU in System > About
To search out out what CPU you have got, merely do the next:
- Sort ‘about’ within the Home windows search bar and hit enter.
- Subsequent to ‘Processor’ it’s going to listing what sort of CPU you have got in your laptop.

Straightforward, proper?
Verify Your Graphics Card
To search out out what sort of graphics card you have got, there are a number of completely different strategies you should use. If you want to discover out the precise mannequin of graphics card you have got, use GPU-Z and the third technique under.
Verify Your GPU in Job Supervisor
To shortly discover out what GPU you have got, do the next:
- Sort ‘activity’ within the Home windows search bar and hit enter.
- In Job Supervisor click on on Efficiency on the left-hand menu (second choice down).
- Your GPU will likely be listed right here.

Verify Your GPU in Gadget Supervisor
You can even discover out what GPU you have got by way of Gadget Supervisor:
- Sort ‘system’ within the Home windows search bar and hit enter.
- In ‘Gadget Supervisor’ click on on the arrow subsequent to ‘Show Adapters’
- Your GPU will likely be listed there.

When you’re checking by way of Gadget Supervisor, it must be famous that it’d present two choices below the ‘Show Adapters’ tab. If it exhibits two choices, which means it’s displaying each the integrated graphics in your processor and the devoted graphics card in your laptop computer.
The one that you’re in search of is the devoted graphics card, as it’s the extra highly effective (and the one your system makes use of) of the 2.
And your devoted graphics card will sometimes be the second choice listed. When you have an Intel processor, the built-in graphics will likely be named one thing like ‘Intel HD Graphics 4000.’ Or, when you’ve got an AMD processor that has built-in graphics, it will likely be one thing like ‘AMD Radeon(TM) Vega 11 Graphics.’ In that case, it is not going to be these choices you need, however the different choice is the GPU your system makes use of.
Additionally, when you’ve got a devoted graphics card, neither of the above-mentioned will present you what particular graphics card mannequin you have got. Sadly, the one option to examine that’s to open up your system, take away your graphics card, and search for the model and mannequin quantity. The model will possible be seen sufficient, however the particular mannequin quantity will most likely be listed someplace on the again of the graphics card on a sticker.
Some third get together instruments like GPU-Z may give you this particular info, although.
Verify Your Particular Graphics Card Mannequin With GPU-Z
Right here’s how one can examine precisely what graphics card mannequin you have got utilizing GPU-Z:
- Obtain GPU-Z from TechPowerUp.
- Open GPU-Z.
- This may present you what GPU you have got and who manufactured it. In my case, it’s a Gigabyte RTX 2060.
- Click on ‘Lookup.’
- This may open a webpage that may let you know precisely what mannequin your graphics card is.

Verify Your Motherboard
To search out out what sort of motherboard you have got, who manufactures it, and what socket and chipset it’s, the method is a bit completely different than it’s to examine different elements in your system.
Verify Your Motherboard By Wanting At It
You might in fact open up your desktop (when you’ve got a desktop and never a laptop computer) and examine and see who manufactures your motherboard and what the mannequin title is on the board.
Motherboards are sometimes named one thing like ASUS Z790-P, or MSI B550M, or Gigabyte GA-AX370-Gaming5, the place ASUS, MSI, and Gigabyte are motherboard manufactures, and Z790, B550, and X370 are the motherboard chipsets (which may additionally lead you to the socket sort of the motherboard as effectively.)

So, in case you’re not considerably aware of who the primary motherboard producers are and what string of letters and numbers to search for that designate the chipset and motherboard title, you may wish to go together with a better choice.
Verify Your Motherboard With System Info
For some customers, you’ll be able to strive the next:
- Within the Home windows search bar, sort in ‘System Info.’
- Scroll down on the System Abstract tab (opens on the left aspect of the window) till you discover ‘Motherboard Producer’, or ‘BaseBoard Producer.’
- The knowledge subsequent to ‘Motherboard/BaseBoard Producer’, ‘Motherboard/BaseBoard Mannequin’, Motherboard/BaseBoard Title’, and/or ‘BaseBoard Product’ ought to provide the info you’re in search of.

Though, in a variety of instances, the data you’ll discover in these tabs will likely be obscure. For example, on my older desktop, the BaseBoard Producer is ‘ASUSTek COMPUTER INC.’, the BaseBoard Mannequin is ‘Not Out there’, and the BaseBoard Title is ‘Base Board’.
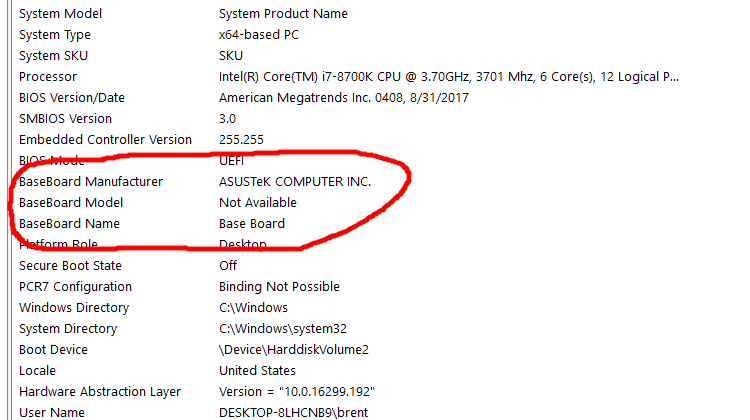
It’s not likely an entire lot to go off of, but it surely does a minimum of let you recognize who manufactured your motherboard. And, it might assist make it simpler to search out the data you’re in search of if you open up your laptop to examine.
Additionally Learn: What Motherboard Do I Have?
Verify Your RAM
Checking how a lot RAM you have got in your laptop is one other very simple activity. In actual fact, you’ll find how a lot reminiscence you have got on the identical display that lists what CPU you have got.
Verify Your RAM in System > About
- Sort ‘about’ within the Home windows search bar and hit enter.
- Within the System > About menu, you’ll see how a lot RAM you have got.

You can even learn how a lot RAM you have got by trying in ‘System Info’ on Home windows 11 or older as outlined within the part above on learn how to discover out what sort of motherboard you have got.
Verify Your Storage
There are a few ways in which you should use to examine how a lot storage you have got and what particular storage system is in your PC.
Verify How A lot Storage Remaining You Have
To see how a lot storage you have got, in addition to how a lot space for storing you have got utilized in your system, do the next.
- Open File Explorer (the folder icon) or sort ‘file’ into the search bar and hit enter.
- Discover Native Disk (normally C:) on the left-hand menu.
- Proper-click Native Disk and hit Properties.

In properties, you’ll be able to see what your system’s whole storage capability is, in addition to how a lot house you’ve used and the way a lot free house you have got left.
Nonetheless, in case you’re seeking to promote your PC and also you wish to embody how a lot storage capability your system has, the whole capability listed below your drive’s properties goes to be a bit deceptive.
In my case, it exhibits I’ve 1.86TB capability. Clearly, there aren’t any 1.86TB drives accessible to buy. Since I do know that I’ve a 2TB drive, I do know that that quantity is off. If I have been going to promote this PC, I wouldn’t say that it has a 1.86TB drive. That will possible be complicated to extra educated patrons.
Verify Your Storage Gadget Mannequin Quantity in Gadget Supervisor
To search out out the producer’s listed capability to your storage system, you’ll be able to strive utilizing system supervisor.
- Sort ‘system’ into the Home windows search bar and hit enter.
- In Gadget Supervisor click on on the arrow subsequent to ‘Disk drives.’
- This may listing your system drive, in my case it’s KINGSTON SKC3000D2048G.
- Seek for the drive that exhibits up in Gadget Supervisor in Google.

In my case, this pulls up outcomes for the KC3000 PCIe 4.0 2TB NVMe M.2 SSD, which I do know is right. This will not work for everybody, however in case you’re having hassle figuring out your particular storage system, this is able to be one of the best ways to take action, outdoors of opening up your laptop or laptop computer and checking.
Whereas the strategies above will simply mean you can examine your laptop’s specs, you too can use third-party hardware monitoring tools that will help you discover mandatory data about your system.
We suggest the next instruments that will help you monitor you laptop’s efficiency, in addition to provide you with info (like what CPU and GPU you have got, in addition to how a lot RAM you have got):
- Essential System Scanner
- CPU-Z
- GPU-Z
- Speccy
- Core Temp (CPU solely)
- HWInfo
- MSI Afterburner
Verify Specs of A Laptop computer?
Whereas this put up may appear extra geared in the direction of individuals who have desktop computer systems, the strategies outlined above will work for laptop computer homeowners as effectively.
When you’re a laptop computer proprietor and also you’re in search of extra info in your laptop computer’s configuration, take a look at the next information: What Kind of Laptop Do I Have?
After You Verify What Laptop Specs You Have…
Now that you recognize what specs your laptop has you can also make a greater resolution on whether or not or not your present system is value upgrading or not. Nonetheless, it must be famous that if you’re seeking to improve your elements, it isn’t so simple as simply selecting out a brand new and higher element and placing it into your system.
Your current elements will decide which new elements you’ll be able to improve to. For example, when you’ve got an older motherboard, you’ll be able to’t merely exit and upgrade to the newest processor, as a result of your motherboard and the latest processor possible aren’t appropriate.
You can also’t exit and improve your graphics card to the largest and best choice accessible in case your current energy provide doesn’t have sufficient energy provide to accommodate the brand new GPU.
In actual fact, in a variety of instances, when you’ve got an older system, it’d make extra sense to only purchase or construct a model new system, as your older system may not have any elements value conserving round. If that’s the case, take a look at our purchaser’s information on shopping for/constructing a cheap PC, or if you wish to spend extra, our purchaser’s information on shopping for/constructing a high-end computer.