Okinos Aqua 7 Mid Tower Case Review Leave a comment
I just lately put collectively an $800 gaming PC build and I used a little-known price range case to place all of it in, the Okinos Aqua 3.
I used to be impressed by how good the Aqua 3 was for the worth it got here in at, and so I did a full written and video review on it.
Afterwards, Okinos reached out to me to see if I needed to evaluation the larger case within the Aqua lineup and, on this publish I’ll be looking on the Okinos Aqua 7.
However, earlier than I get into what it was like constructing on this case, first let me go over all of its specs and options.
Overview, Specs, & Options

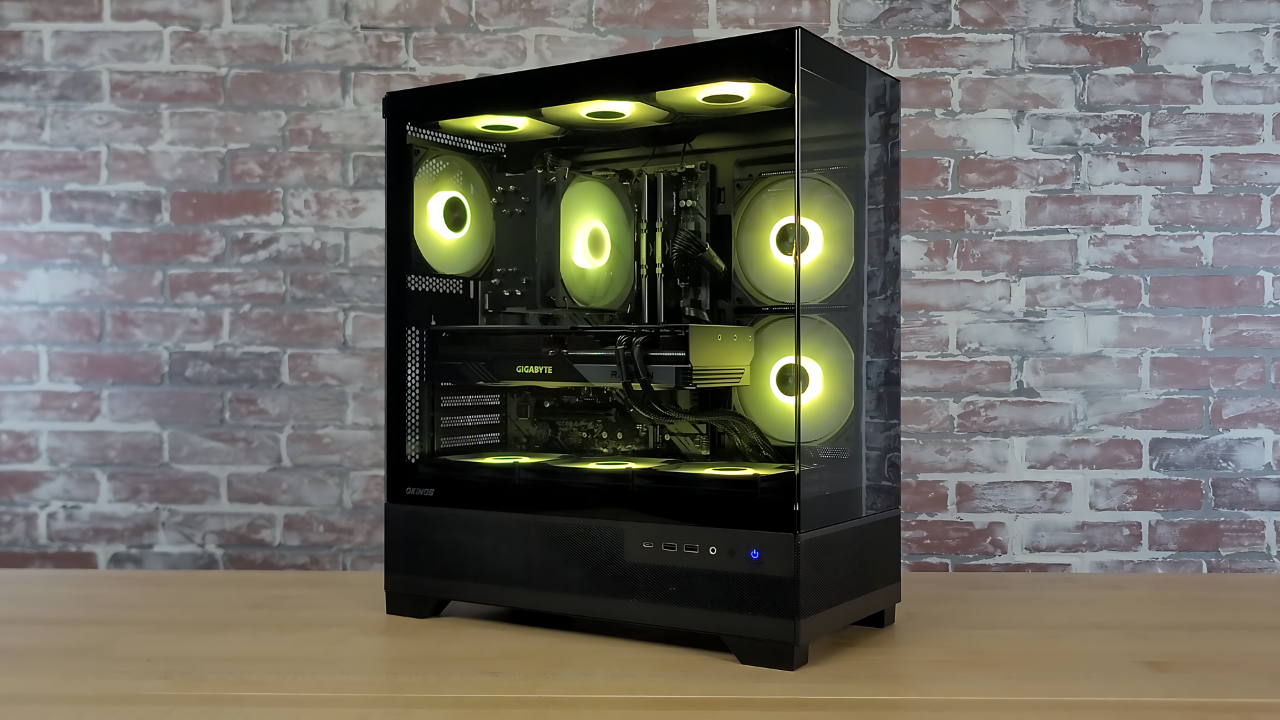
Okinos has three complete Aqua-series choices, the three, 5, and seven, and all are panoramic-style circumstances.
The 7 is the most important within the collection, and the one one of many three that may match a standard-ATX motherboard.
The Aqua 7 comes with six 120mm PWM ARGB followers pre-installed. So, that’s three extra followers than the Aqua 3 and the Aqua 3’s followers AREN’T PWM followers, in order that’s a pleasant improve for the Aqua 7.
One other attention-grabbing characteristic for the Aqua 7 is that 5 of the followers (the 2 followers on the aspect and the three followers positioned on the backside) spin in reverse route.

Principally, what this implies is that these 5 followers really consumption air into the case, regardless of trying like they’re set as much as exhaust air out of the case.

Within the Aqua 3, the entire followers are set to exhaust air out of the case, and when you needed to have a configuration that introduced air in, you’d should flip the followers round and then you definitely’d see the bracketed-size of the fan, which isn’t as aesthetically pleasing to take a look at.
So, through the use of reverse route followers, Okinos has offered one of the best of each worlds… offering each the flexibility to consumption air into the case with out hurting the aesthetics of the ARGB followers.

I additionally bought three further Okinos ARGB PWM case followers for $10 so as to add to the highest panel of this case, all of which can be set to exhaust, and so I feel there needs to be an excellent stability between intaking and exhausting air out of the case, and, after all, there can be a ton of ARGB lighting to work with.

The highest panel of this case also can assist as much as a 360mm lengthy radiator, so whether or not you wish to do a customized cooling setup, or get a bigger AIO, you are able to do that on this case.

You can even exchange the 2 followers on the aspect of the case with a 240mm radiator. Simply be aware, although, that it will dramatically scale back the clearance to your graphics card to simply 270mm, as an AIO put in right here will stick out far sufficient to dam the set up of an extended graphics card.

With out an AIO put in on the aspect, the Aqua 7 can home graphics playing cards as much as 410mm lengthy, which is sufficient clearance to carry all the best way as much as an RTX 4090.

So, there aren’t any graphics card limitations with this case.
And, for air coolers, the case can maintain choices as much as 160mm tall.

The entrance panel on the Aqua 7 comes with an audio jack, two USB 3.0 ports, and a USB-C port. Sadly, I don’t have a USB-C header on my motherboard, so I received’t have the ability to use that.

The underside compartment comes with a small 3.5-inch storage bay, however it will probably simply be eliminated by eradicating these two screws on the backside.

As soon as these screws are eliminated, the bay simply slides out, providing you with much more room to cover cables in.

And, lastly, the case comes with a fan and ARGB controller preinstalled. You’ll be able to join 6-fans and 6-ARGB connections to the controller and it does require a SATA energy connection out of your energy provide.

Since I added three further OKINOS ARGB followers, I did want to make use of a few fan and ARGB splitters to get every part related.

Alright, that’s a normal run down of the specs and options, so let’s now get into what it was prefer to construct inside this case.
Constructing within the Aqua 7

I took the entire components from a $1,000 gaming PC build I put collectively initially of the 12 months, which was housed in a Phanteks P400A, and I moved every part into this construct.

I additionally took this time to improve the Ryzen 5 5600X in my previous construct to a Ryzen 7 5700X3D, as I’ll be benchmarking the 5700X3D in an upcoming video/publish to check it to the 5600X.

General, constructing within the Aqua 7 was a constructive expertise.
For some professionals of this case, I actually like how each glass panels are toolless and might simply be popped off with somewhat little bit of power.

And, with the entrance glass panel eliminated, you could have lots of room to work with contained in the case, and it permits you entry from angles that the majority circumstances don’t provide, and that each one positively helps with the constructing course of.

One other professional of the Aqua 7 is the preinstalled fan and ARGB controller. The entire followers and their ARGB lights are pre-connected and so, so long as you don’t wish to add any further followers or lighting, all you must do is join SATA energy out of your energy provide to the controller, and then you definitely’ll simply want to attach the controller to a 3-pin ARGB header and fan header in your motherboard.

Once more, I did add an extra three followers to the highest panel of the case, so I needed to liberate some room on the controller through the use of a few ARGB-splitters and fan splitters.

Thermals
With 9 complete followers, plus a Thermalright Burst Assasin CPU cooler, I used to be capable of obtain wonderful thermals…
I benchmarked the system in Cinebench’s multi-core CPU check and the Ryzen 7 5700X3D averaged about 75-degrees Celsius, which is properly inside regular working temperatures for the 5700X3D.

And, I additionally ran Metro Exodus’ benchmark instrument, and neither the 5700X3D or the 7800XT exceeded 60-degrees.

I’m unsure how a lot including the three further followers helped, as I didn’t run the exams with out the highest followers, however general the thermals on the case are superb with how I’ve it configured.
One thing to Be Conscious Of…
One factor that you just’ll need to pay attention to when you get the Aqua 7 is that, with the underside followers put in, it will likely be very troublesome to screw within the three bottom-most motherboard screws…

…and it’ll even be almost not possible to make the connections on the backside of your motherboard…

I needed to briefly eliminated the 2 rear-most backside followers to mount the motherboard and make these connections.

It’s probably not a giant deal and I don’t suppose there’s a approach Okinos may have dealt with this higher, nevertheless it’s one thing you ought to be conscious of when you’re planning on constructing inside this case.
However, general, it’s a pretty minor situation in comparison with what the case presents for the worth it is available in at…
Conclusion

All-in-all, I feel the Aqua 7 is a strong case and I’d positively advocate it to anybody who’s on the lookout for a reasonably inexpensive panoramic fashion case that comes with lots of ARGB lighting preinstalled.
However, that does it for this evaluation. In case you’re taken with selecting up this case, you will get it by way of this link on Amazon.
That’s an affiliate hyperlink and if you are going to buy something from Amazon after clicking on the hyperlink I would obtain a small fee. This drastically helps assist my web site and any assist is appreciated.
However, after all, you may all the time simply go to Amazon and seek for the Aqua 7 as properly.
In any case, thanks all for studying, I hope you discovered this evaluation useful.